How to Use the Gabscriber App
In this tutorial, I will walk you through the process of using Gabscriber, an app that allows you to transcribe your spoken words into text in real-time.
Internet Connection Check
The moment you open this app, the app checks your internet connection. This app uses Microsoft's online speech recognition technology. This technology requires an internet connection. If upon start up, you are not connected to the internet, the app looks like this:
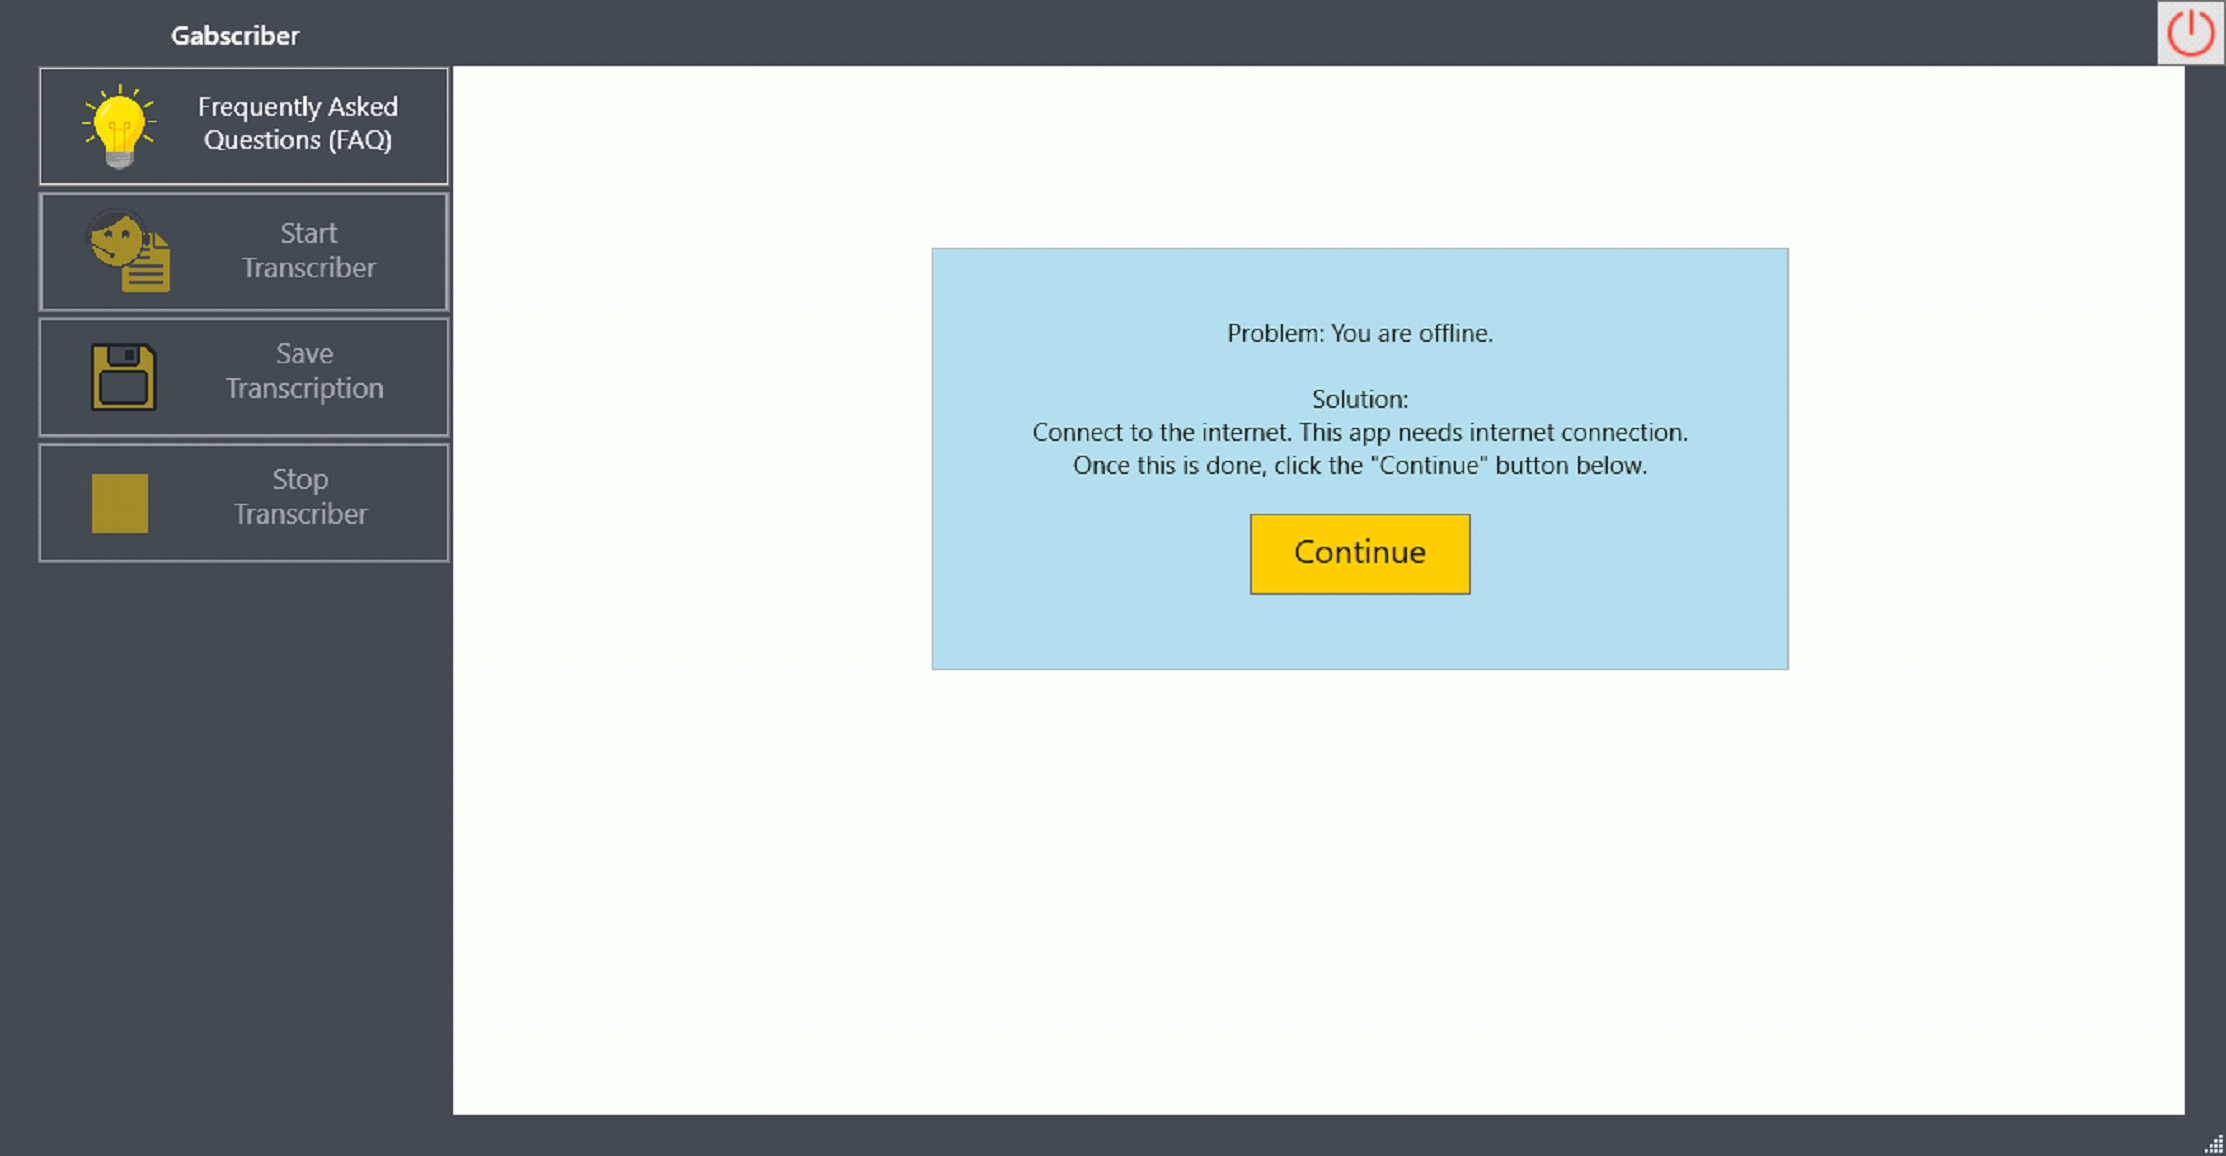
The message says: "Problem: You are offline. Solution: Connect to the internet. This app needs an internet connection. Once this is done, click the 'Continue' button below."
If you click on the Continue button without connecting to the internet, this message will persistently show, preventing you from starting your transcription. However, if you connect to the internet and then click the Continue button, this message will disappear, enabling you to start your transcription.
This internet check message only appears upon start-up. If during the actual transcription, you go offline, transcription will automatically be paused and when you are back online, your transcription will automatically restart.
If upon start-up, you are already connected to the internet (this also applies when you followed the above procedure), the app looks like this:

Inside this main page are 4 buttons:
1) Frequently Asked Questions (FAQ) Button
2) Start Transcriber Button
3) Save Transcription Button
4) Stop Transcriber Button
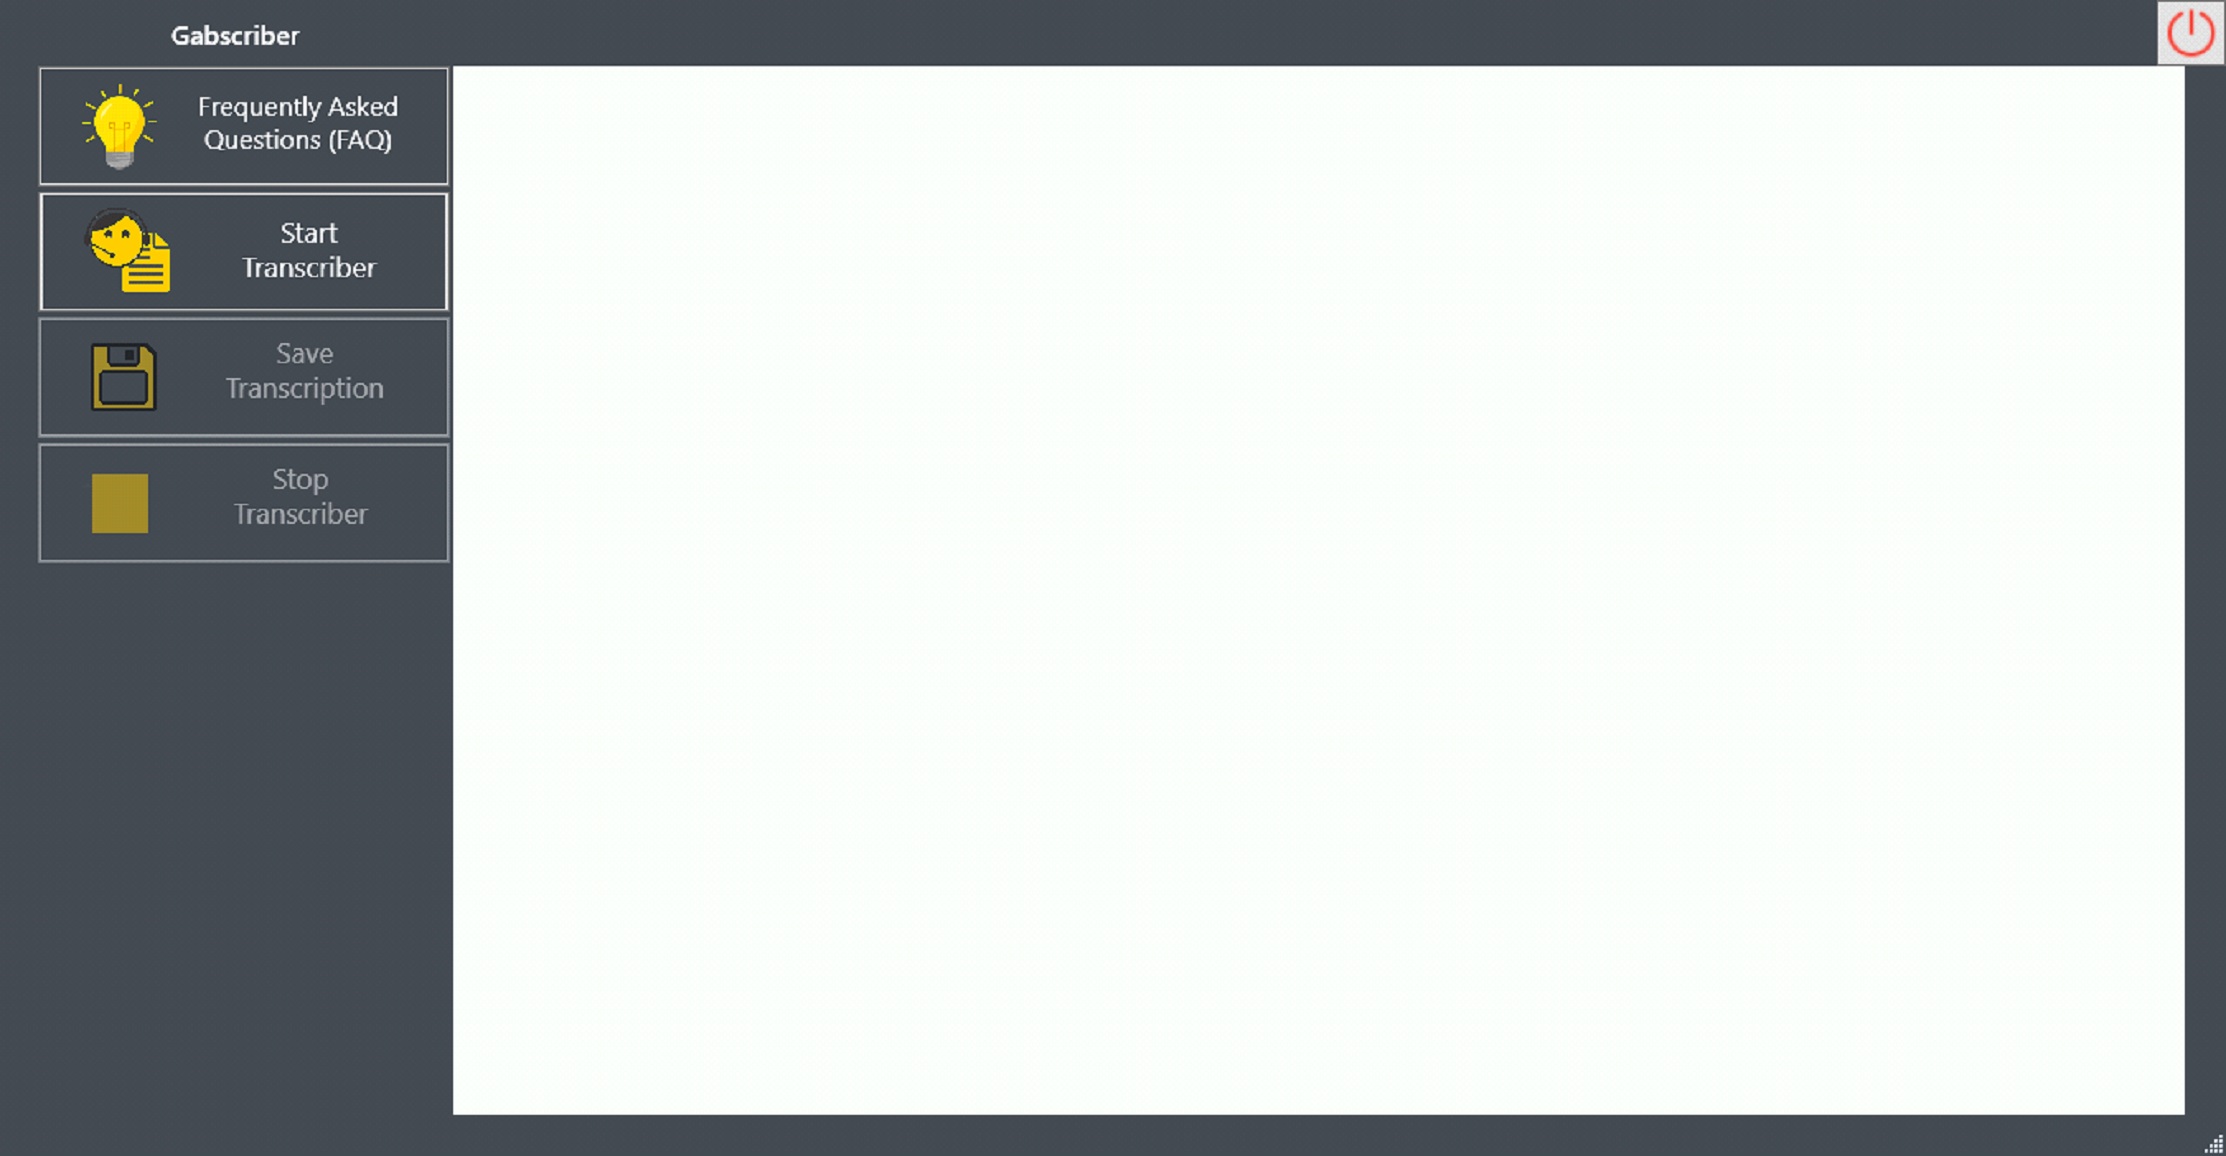
On start-up, only FAQ and Start buttons are enabled. The Save and Stop buttons are disabled.
Frequently Asked Questions (FAQ) Button
If you click on the FAQ button, this window pops out:
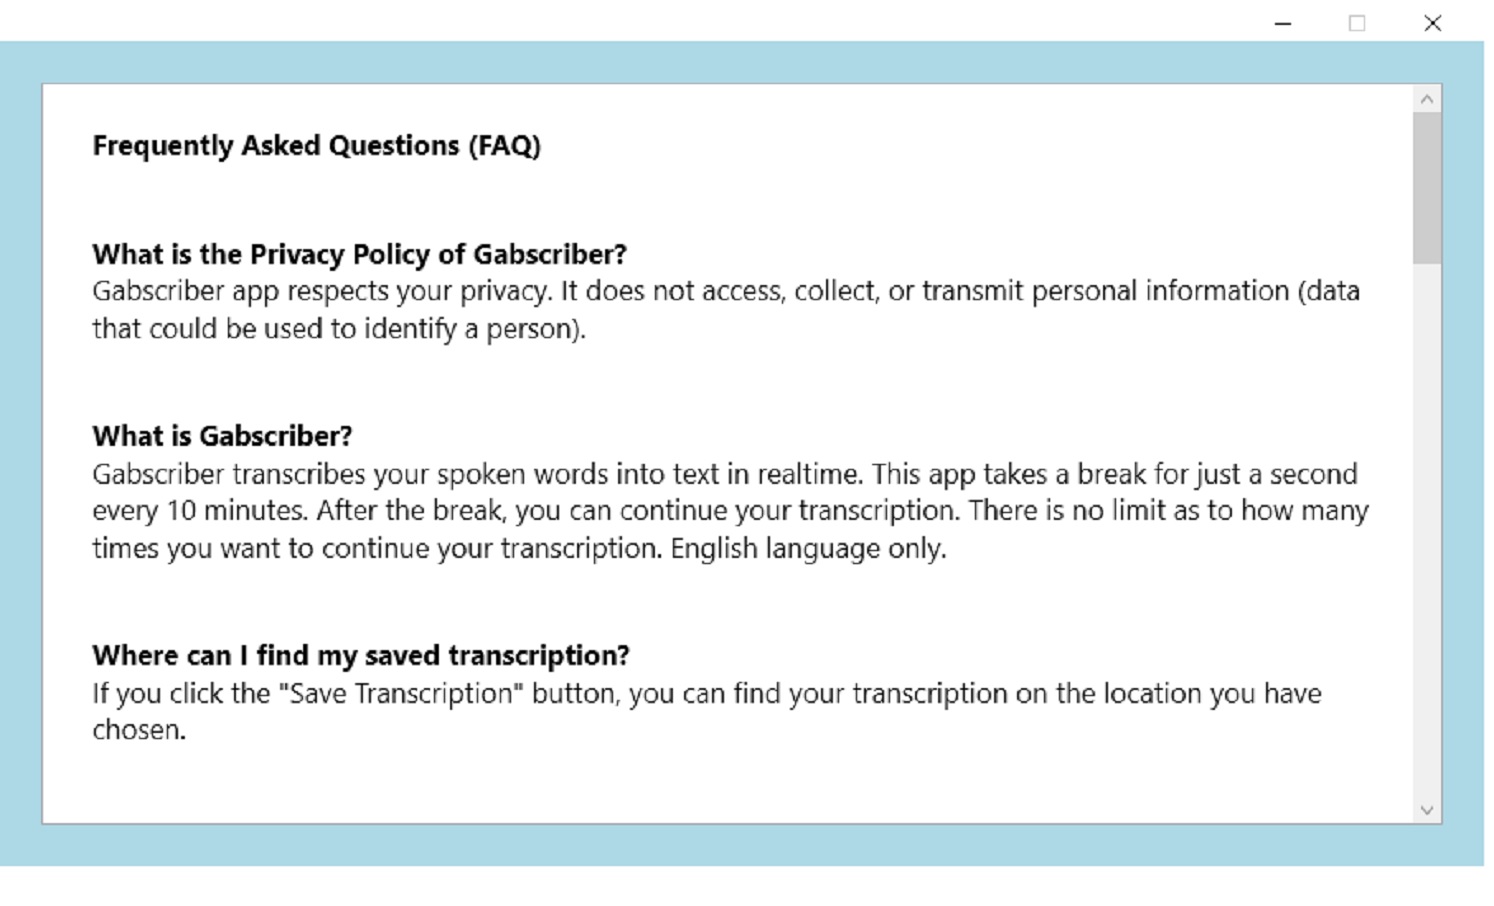
This window is very important as it answers the most important questions, including the following:
1) What is the Privacy Policy of Gabscriber?
2) What is Gabscriber?
3) Where can I find my saved transcription?
4) What are the requirements for this app to work?
5) What should be done to improve the transcription quality?
6) What are the dictation commands that can be used on this app?
7) Is Gabscriber capable of perfect transcription?
8) What should be done if something goes wrong with the app?
In this tutorial, we will cover the answers to the above-mentioned questions.
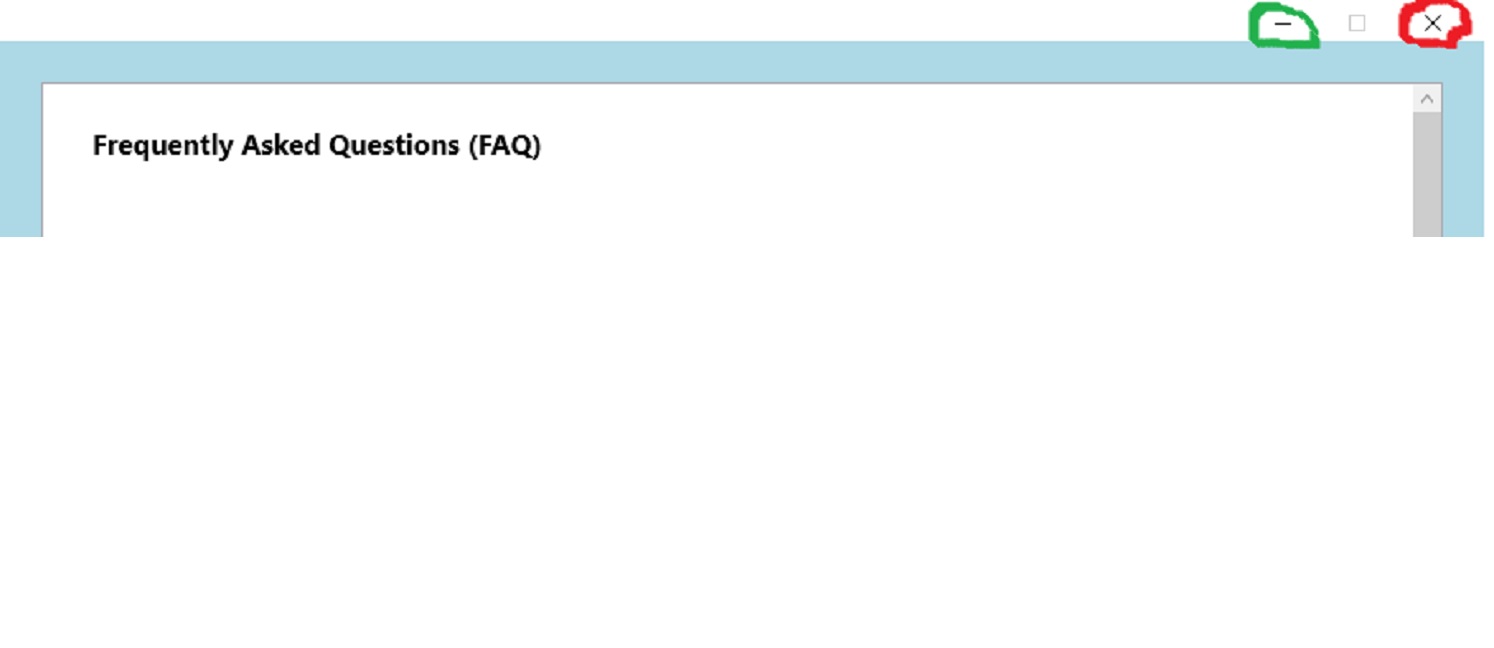
You can either minimize or close this FAQ window. In the screencap below, you can minimize the window by clicking the dash button (highlighted in green) and close it via the x button (highlighted in red).
Start Transcriber Button
Microphone CheckWhen you click the Start button, the app first checks your microphone. If there is an issue with the microphone, this message pops up:
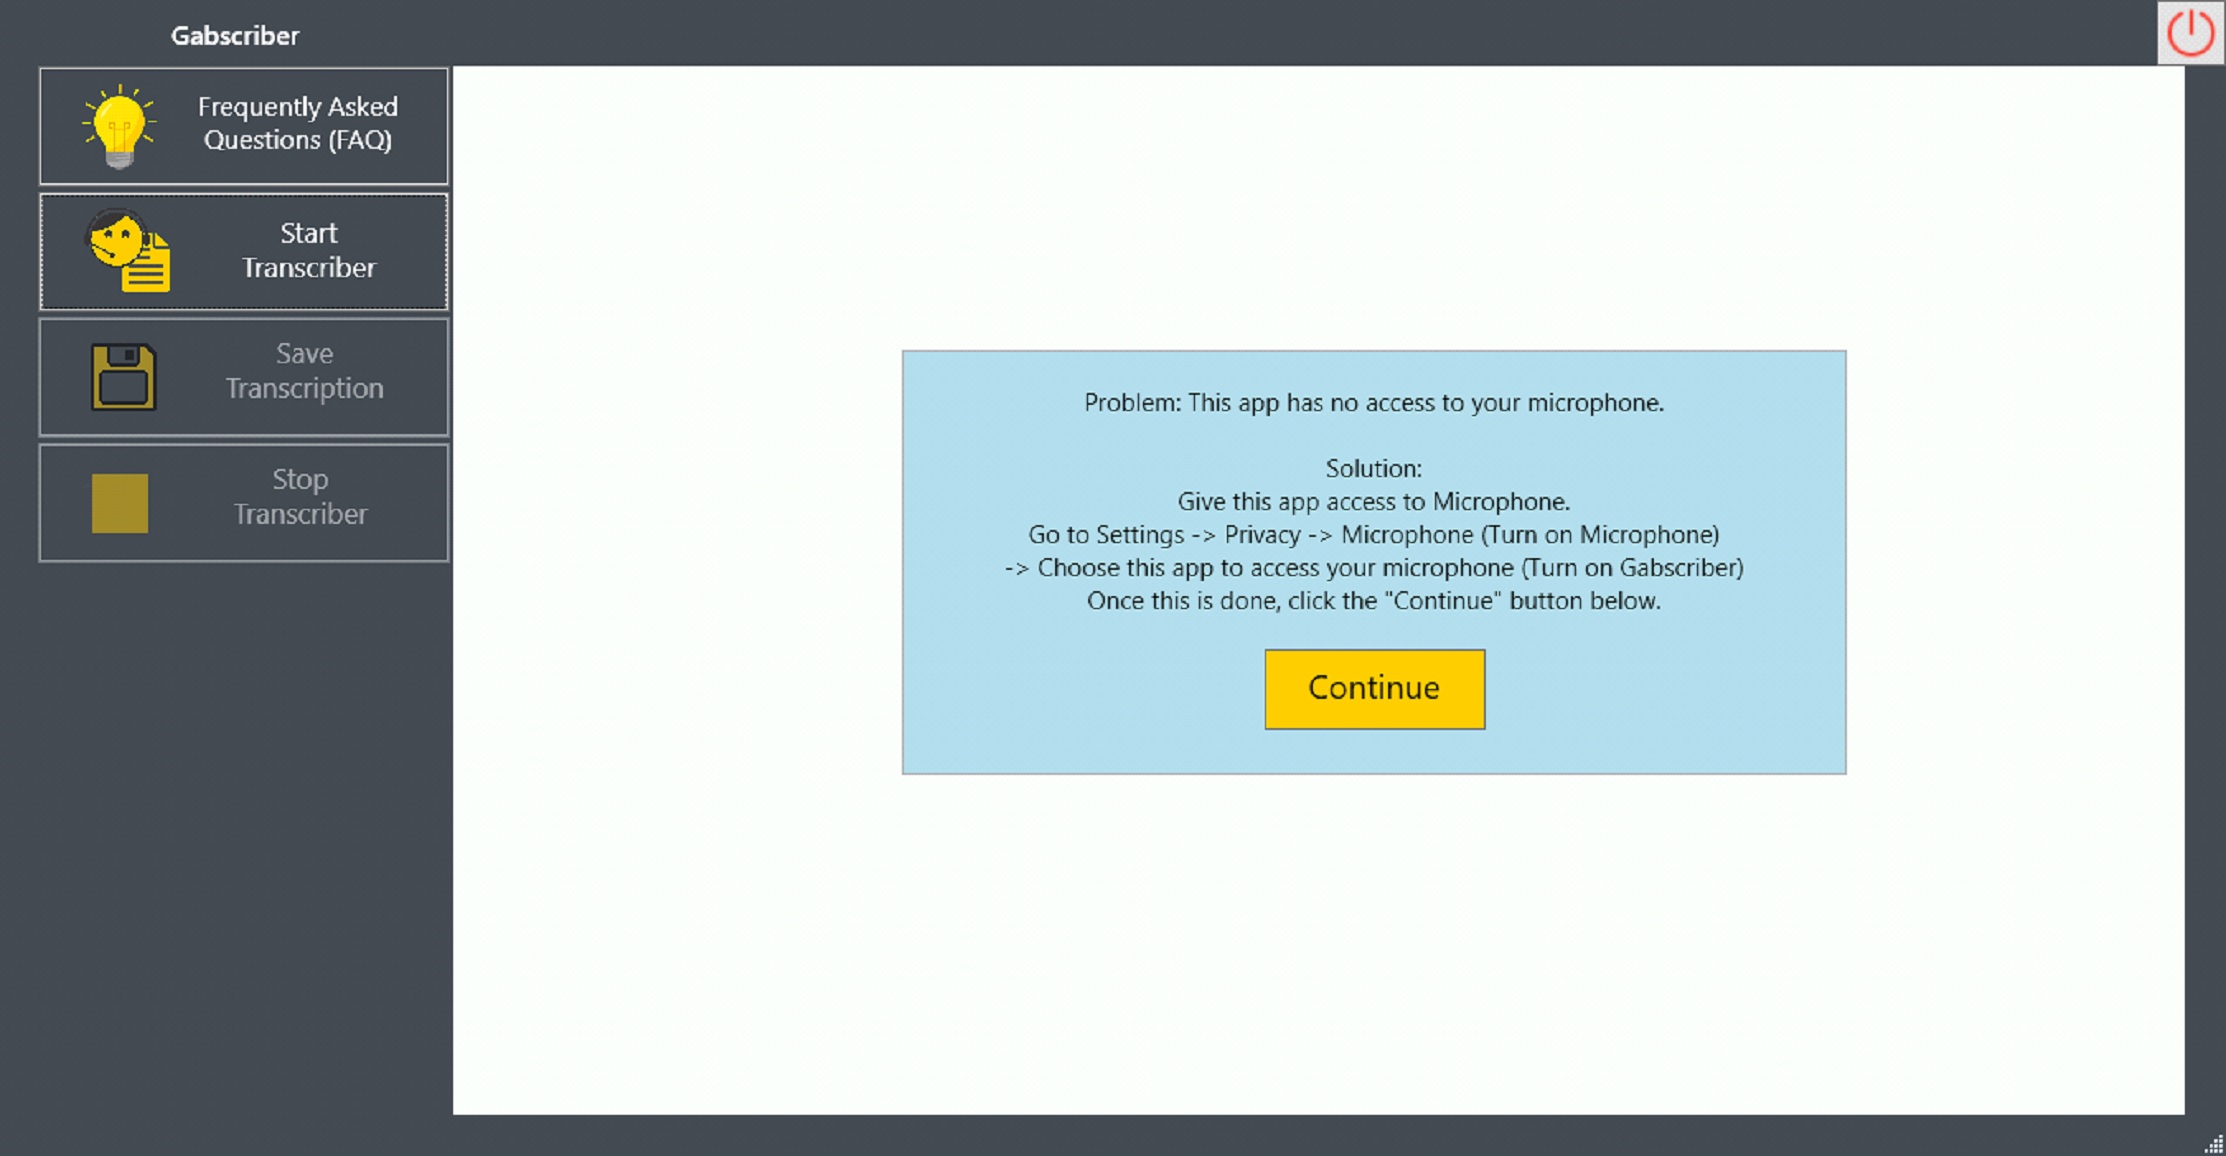
The message says, "Problem: This app has no access to your microphone. Solution: Give this app access to Microphone. Go to Settings -> Privacy -> Microphone (Turn on Microphone) -> Choose this app to access your microphone (Turn on Gabscriber). Once this is done, click the 'Continue' button below."
Please follow the message instructions. If you click the Continue button without fixing the microphone issue/s, the message will persistently show, preventing you from starting your transcription.
Microsoft Speech Check
Once the microphone issue/s is fixed, the app moves on to the next step of checking Microsoft Speech. Microsoft Speech initializes Microsoft's online speech recognition technology. If Microsoft Speech is not enabled, this message pops up:
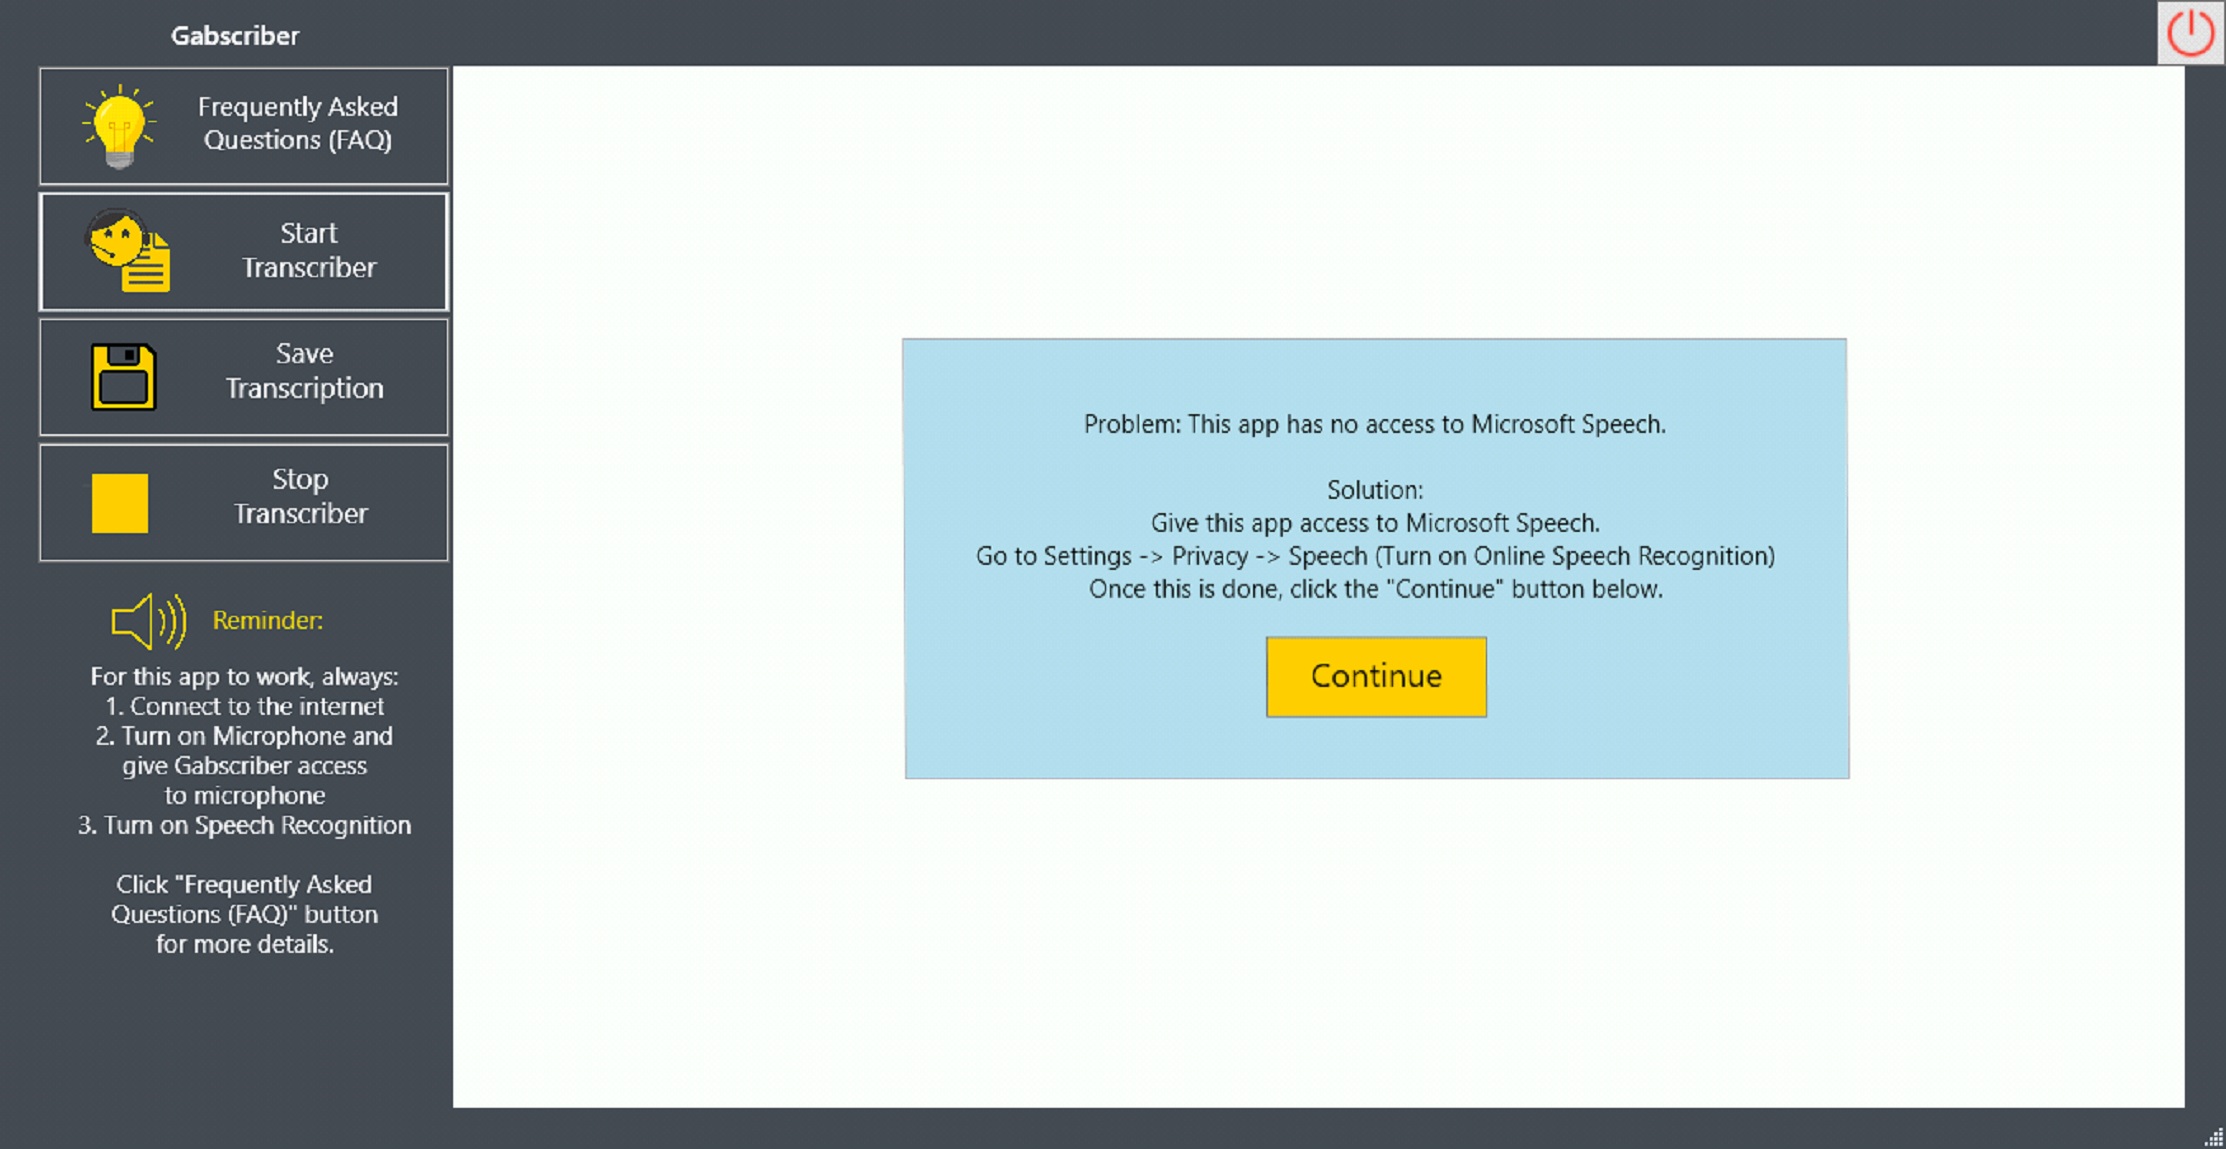
The message says: "Problem: This app has no access to Microsoft Speech. Solution: Give this app access to Microsoft Speech. Go to Settings -> Speech (Turn on Online Speech Recognition). Once this is done, click the 'Continue' button below."
Please follow the message instructions. If you click on the Continue button without fixing the Microsoft Speech issue, the message will persistently show, preventing you from starting your transcription.
If the Microsoft Speech issue is fixed, you can now start your transcription and the app looks like this:

As shown above, the 4 buttons are all enabled. Below the Stop button, there is a "Reminder" part which says:
"For this app to work, always:
1. Connect to the internet
2. Turn on the Microphone and give Gabscriber access to the microphone
3. Turn on Speech Recognition
Click the 'Frequently Asked Questions (FAQ)' button for more details."
Just keep this reminder in mind when using this app.
At the heart of this app, this message also appears: "I'm waiting for you to talk .... Your Transcription will be shown here."
When this message appears, start talking via your microphone and Gabscriber will show your spoken words in text in real-time like so:
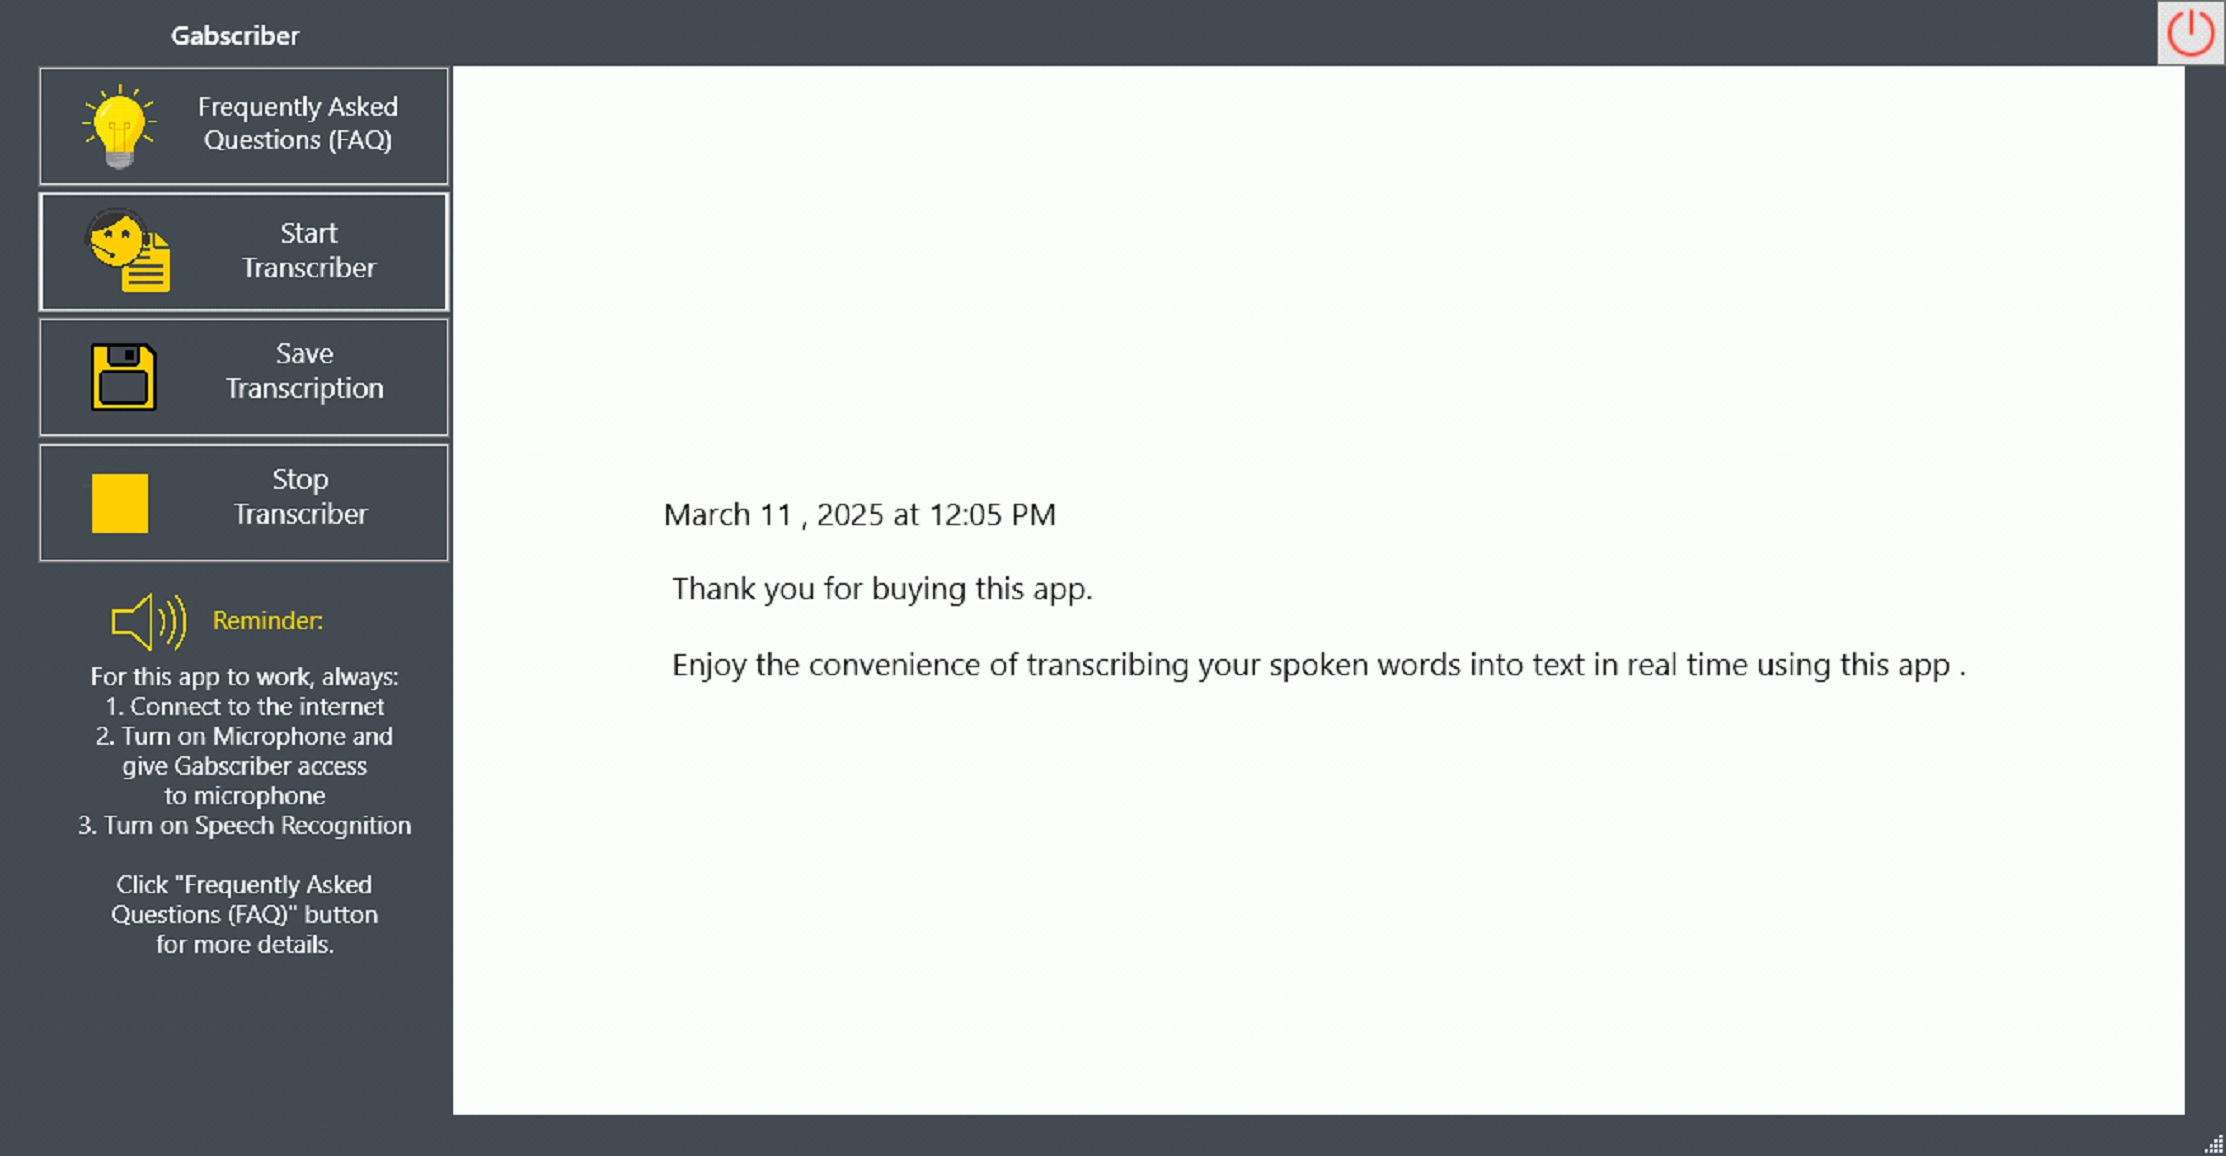
In this example, the moment I speak to the microphone, the default text, which is "I'm waiting for you to talk .... Your Transcription will be shown here." disappears and my spoken words turned into text are shown.
In this example, I said, "March eleven comma twenty twenty-five at twelve zero five pm new paragraph thank you for buying this app period new paragraph enjoy the convenience of transcribing your spoken words into text in real time using this app period"
Transcription Tips:
To make your transcription better, follow these steps:
1. Use these dictation commands:
- To insert a new line in the document, say "New line".
- To insert a new paragraph in the document, say "New paragraph".
- You can use the following one-symbol punctuation marks: period, comma, colon, semicolon, question mark, exclamation mark, hyphen, and ellipsis. You can also use the following two-symbol punctuation marks: parentheses and brackets. For one-symbol punctuation marks, just say after the word, "Period", for example. For two-symbol punctuation marks, before the beginning of the word say, "Open Parentheses", and after the word say, "Close Parentheses".
2. Use a good-quality microphone
Microphone quality matters. If you have a poor-quality microphone, the transcription quality is equally poor.
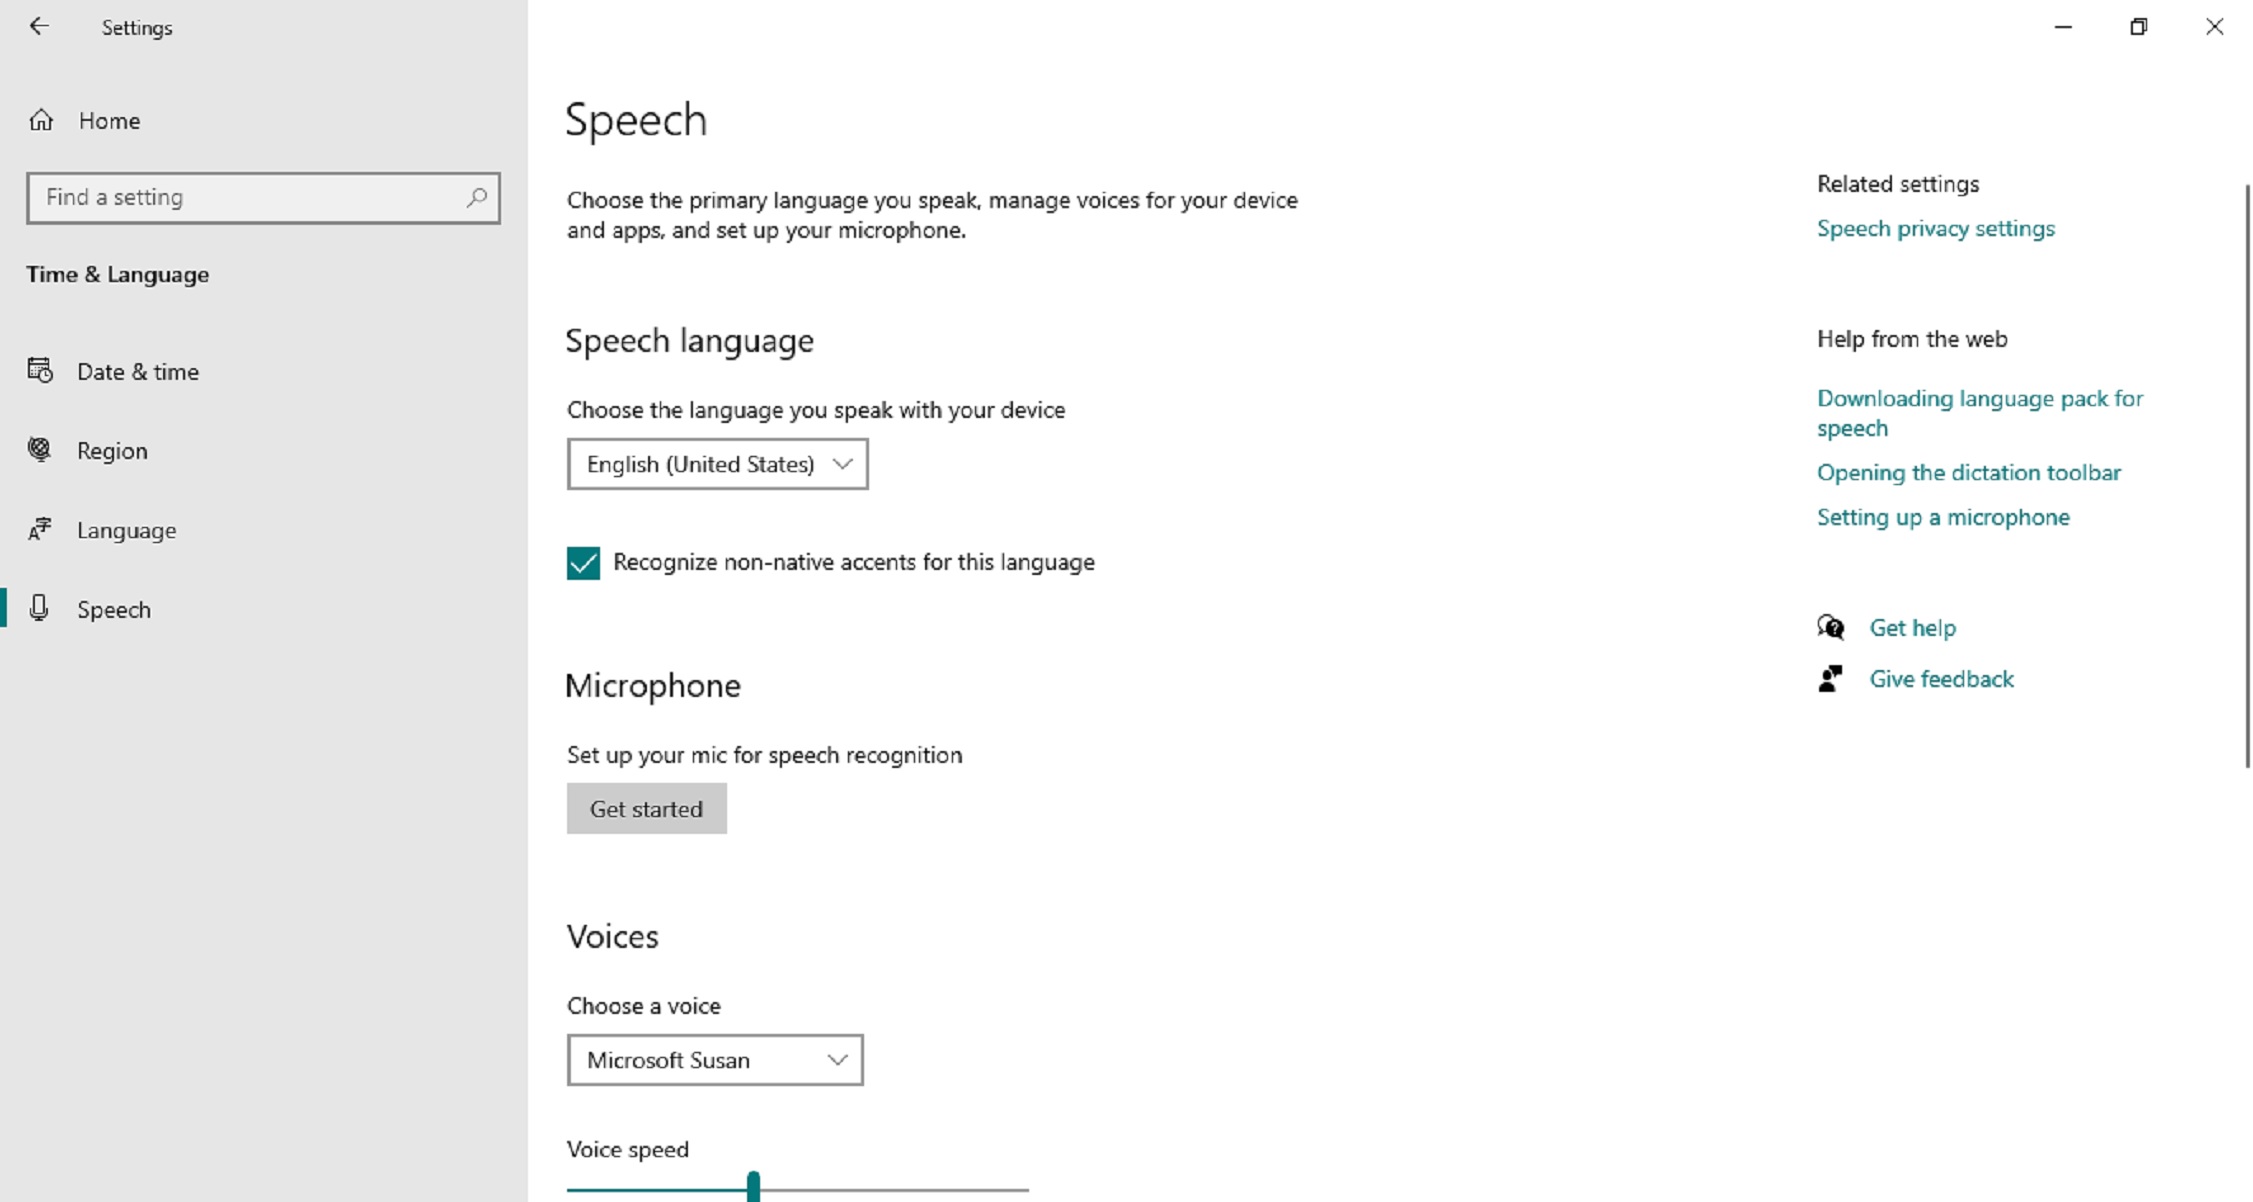
3. Improve speech quality by adjusting settings
Go to Settings -> Time and Language -> Speech -> Speech Language (Choose English(United States)) -> Microphone (Set up your mic for speech recognition) -> Voices (Choose a voice) -> Voice Speed (Adjust voice speed)
4. Just talk to Gabscriber
The more you talk to Gabscriber, its transcription keeps getting better as it understands your speech nuances better.
5. Review
Gabscriber is not perfect. Users need to review Gabscriber's transcription.
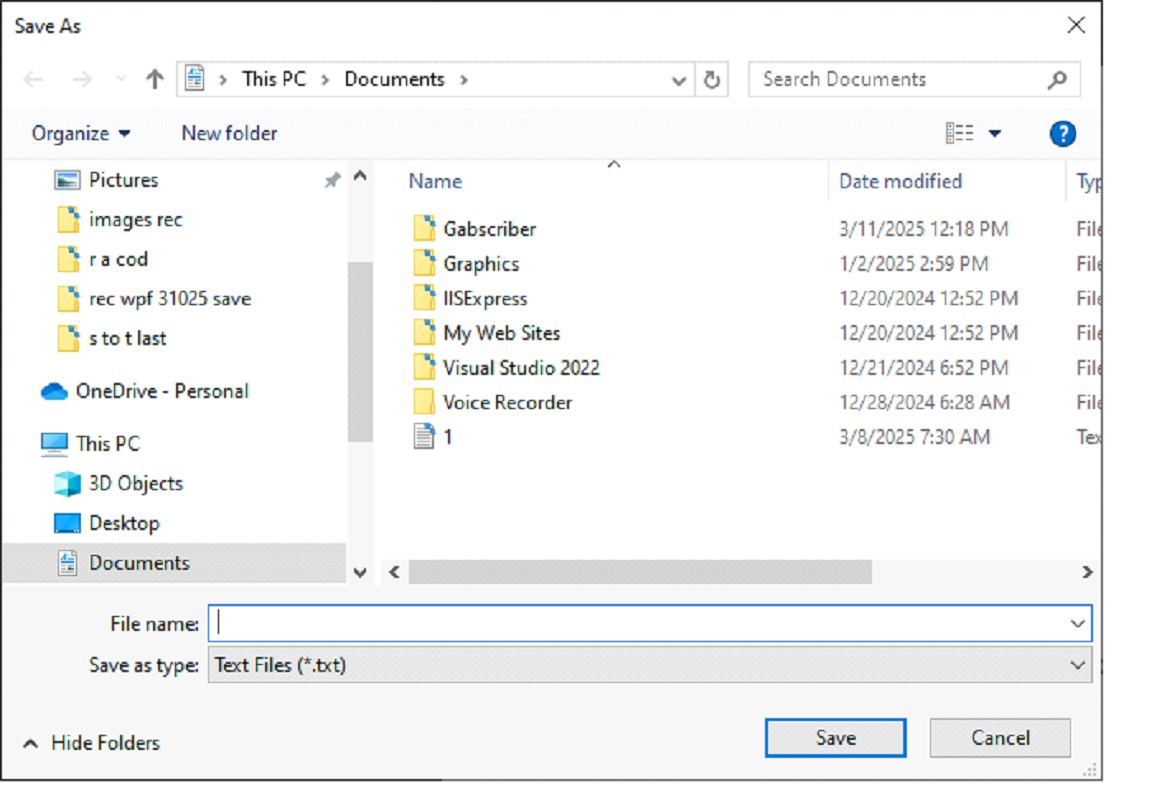
Save Button
At any time during the transcription, you can save your work at the location of your choice.
Stop Button
At any time during the transcription, you can stop the transcription by clicking the "Stop" button. This stops the whole transcription process. The following are the effects:
1. Your transcription is automatically save to File Explorer -> Documents Folder -> Gabscriber Folder with text file named "gabscriber_stop{timestamp}". Timestamp refers to transcription year, month, day, hour, minute, seconds.
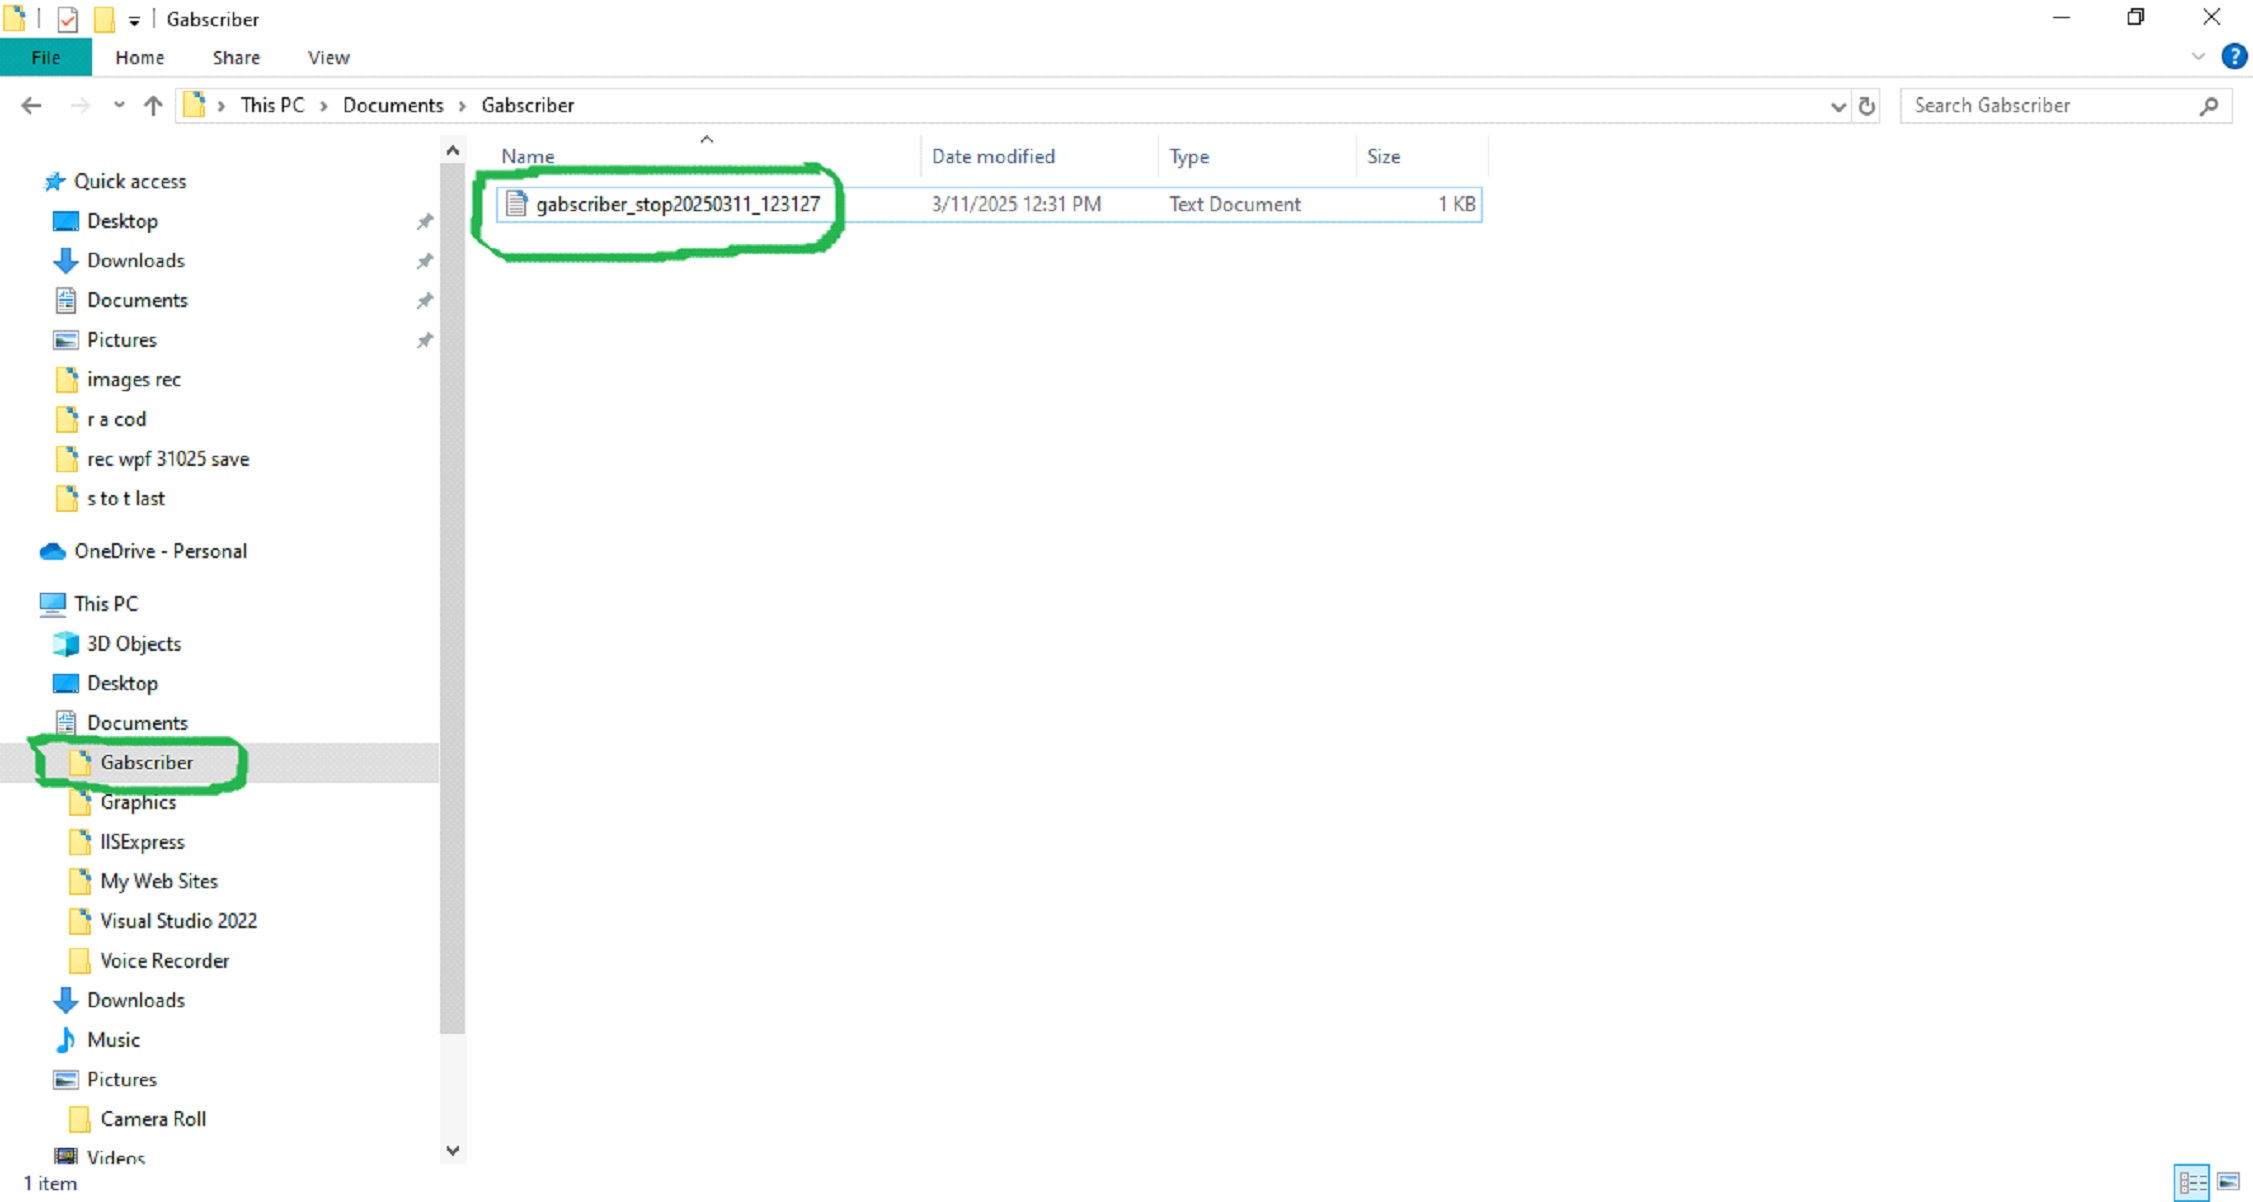
2. Clicking the Stop button also allows you to start another new batch of transcription as this page below shows again:
10-Minute Break
After 10 minutes of transcription, this message pops up:
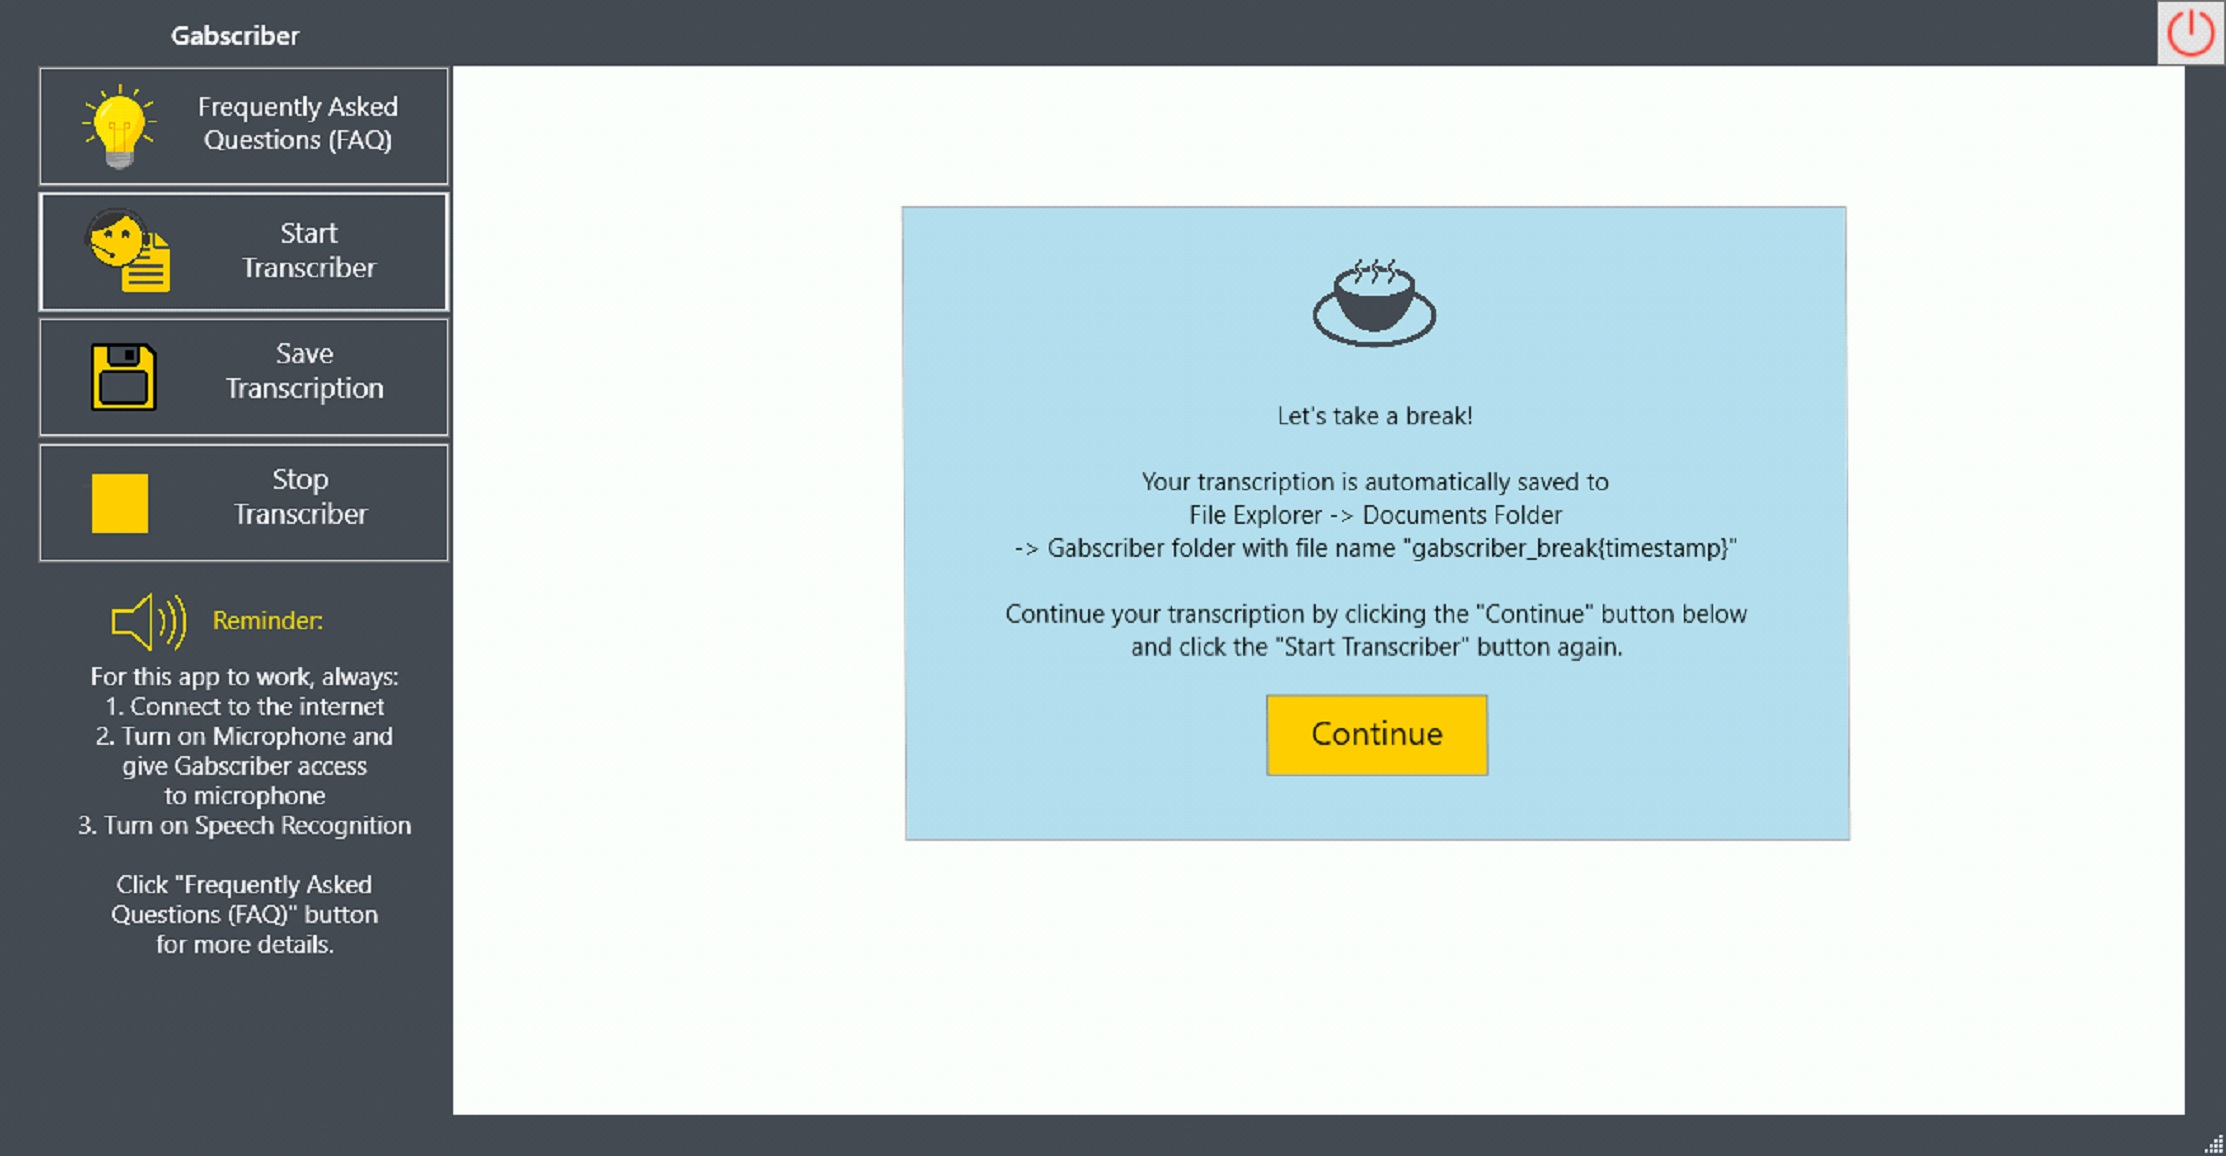
The message says, "Let's take a break! Your transcription is automatically saved to File Explorer -> Documents Folder -> Gabscriber folder with file name 'gabscriber_break{timestamp}' Continue your transcription by clicking the "Continue" button below and click the 'Start Transcriber' button again."
When you click the Continue button, the page below shows up again, allowing you to continue your transcription. There is no limit on how many times you want to continue your transcription.

If something goes wrong with the app, simply turn it off and on. Make sure that the 3 main app requirements are enabled. If the problem persists, please contact the app developers at [email protected]
How can I contact the developers if I have questions not answered here?
Contact the app developers at [email protected]